Описание
Базовый класс, из которого создаются ящики с пользовательскими свойствами. Используйте это для создания настраиваемых ящиков для ваших собственных классов Serializable или для переменных сценария с пользовательскими PropertyAttribute.
PropertyDrawers можно использовать двумя способами:
- Настройте графический интерфейс каждого экземпляра класса Serializable.
- Настройте графический интерфейс членов скрипта с помощью пользовательских PropertyAttribute.
Если у вас есть пользовательский класс Serializable, вы можете использовать PropertyDrawer для управления тем, как он выглядит в Инспекторе. Рассмотрим компонент класса Serializable в сценарии ниже:
using System;
using UnityEngine;

public enum IngredientUnit { Spoon, Cup, Bowl, Piece }

// Custom serializable class
[Serializable]
public class Ingredient
{
    public string name;
    public int amount = 1;
    public IngredientUnit unit;
}

public class Recipe : MonoBehaviour
{
    public Ingredient potionResult;
    public Ingredient[] potionIngredients;
}
С помощью пользовательского PropertyDrawer можно изменить каждое появление класса Ingredient в инспекторе.
Вы можете присоединить PropertyDrawer к классу Serializable с помощью атрибута CustomPropertyDrawer и передать тип класса Serializable, для которого он является выдвижным ящиком.
Вы можете либо использовать UIElements для создания собственного PropertyDrawer, либо использовать IMGUI. Чтобы создать собственный PropertyDrawer с помощью UIElements, необходимо переопределить PropertyDrawer.CreatePropertyGUI в классе PropertyDrawer. Чтобы создать собственный PropertyDrawer с помощью IMGUI, необходимо переопределить PropertyDrawer.OnGUI в классе PropertyDrawer.
Если PropertyDrawer используется внутри инспектора на основе UIElement или EditorWindow, реализация UIElement будет использоваться, если PropertyDrawer.CreatePropertyGUI перезаписывается резервным вариантом для любой реализации IMGUI. Если PropertyDrawer используется внутри инспектора на основе IMGUI или EditorWindow, будет отображаться только реализация IMGUI. Вы не можете запускать UIElement внутри IMGUI.
Вот пример пользовательского PropertyDrawer, написанного с использованием UIElements:
using UnityEditor;
using UnityEditor.UIElements;
using UnityEngine.UIElements;

// IngredientDrawerUIE
[CustomPropertyDrawer(typeof(Ingredient))]
public class IngredientDrawerUIE : PropertyDrawer
{
    public override VisualElement CreatePropertyGUI(SerializedProperty property)
    {
        // Create property container element.
        var container = new VisualElement();

        // Create property fields.
        var amountField = new PropertyField(property.FindPropertyRelative("amount"));
        var unitField = new PropertyField(property.FindPropertyRelative("unit"));
        var nameField = new PropertyField(property.FindPropertyRelative("name"), "Fancy Name");

        // Add fields to the container.
        container.Add(amountField);
        container.Add(unitField);
        container.Add(nameField);

        return container;
    }
}
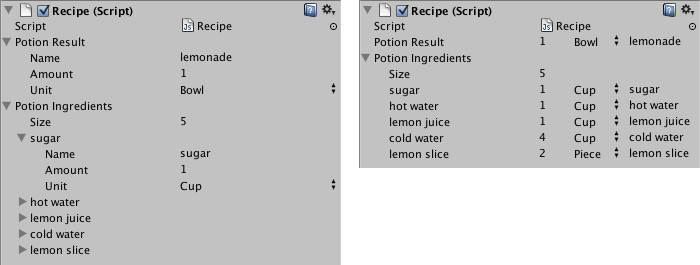
Вот пример пользовательского PropertyDrawer, написанного с использованием IMGUI. Сравните внешний вид свойств ингредиентов в Инспекторе без пользовательского PropertyDrawer и с ним:

using UnityEditor;
using UnityEngine;

// IngredientDrawer
[CustomPropertyDrawer(typeof(Ingredient))]
public class IngredientDrawer : PropertyDrawer
{
    // Draw the property inside the given rect
    public override void OnGUI(Rect position, SerializedProperty property, GUIContent label)
    {
        // Using BeginProperty / EndProperty on the parent property means that
        // prefab override logic works on the entire property.
        EditorGUI.BeginProperty(position, label, property);

        // Draw label
        position = EditorGUI.PrefixLabel(position, GUIUtility.GetControlID(FocusType.Passive), label);

        // Don't make child fields be indented
        var indent = EditorGUI.indentLevel;
        EditorGUI.indentLevel = 0;

        // Calculate rects
        var amountRect = new Rect(position.x, position.y, 30, position.height);
        var unitRect = new Rect(position.x + 35, position.y, 50, position.height);
        var nameRect = new Rect(position.x + 90, position.y, position.width - 90, position.height);

        // Draw fields - passs GUIContent.none to each so they are drawn without labels
        EditorGUI.PropertyField(amountRect, property.FindPropertyRelative("amount"), GUIContent.none);
        EditorGUI.PropertyField(unitRect, property.FindPropertyRelative("unit"), GUIContent.none);
        EditorGUI.PropertyField(nameRect, property.FindPropertyRelative("name"), GUIContent.none);

        // Set indent back to what it was
        EditorGUI.indentLevel = indent;

EditorGUI.EndProperty();
    }
}
Еще одно применение PropertyDrawer — изменение внешнего вида элементов в сценарии с пользовательским PropertyAttribute. Допустим, вы хотите ограничить плавающие или целые числа в своем скрипте определенным диапазоном и отобразить их в виде ползунков в Инспекторе. Используя встроенный PropertyAttribute, называемый RangeAttribute, вы можете сделать это:
using UnityEngine;
using System.Collections;

public class ExampleClass : MonoBehaviour
{
    // Show this float in the Inspector as a slider between 0 and 10
    [Range(0.0F, 10.0F)]
    public float myFloat = 0.0F;
}
Вы также можете создать свой собственный PropertyAttribute. Мы будем использовать код для RangeAttribute в качестве примера. Атрибут должен расширять класс PropertyAttribute. При желании ваше свойство может принимать параметры и сохранять их как общедоступные переменные-члены.
// This is not an editor script. The property attribute class should be placed in a regular script file.
using UnityEngine;

public class RangeAttribute : PropertyAttribute
{
    public float min;
    public float max;

    public RangeAttribute(float min, float max)
    {
        this.min = min;
        this.max = max;
    }
}
Теперь, когда у вас есть атрибут, вам нужно создать PropertyDrawer, который рисует свойства, имеющие этот атрибут. Ящик должен расширять класс PropertyDrawer и должен иметь атрибут CustomPropertyDrawer, чтобы указать, для какого атрибута он является ящиком. Вот пример использования IMGUI:
// The property drawer class should be placed in an editor script, inside a folder called Editor.

// Tell the RangeDrawer that it is a drawer for properties with the RangeAttribute.
using UnityEngine;
using UnityEditor;

[CustomPropertyDrawer(typeof(RangeAttribute))]
public class RangeDrawer : PropertyDrawer
{
    // Draw the property inside the given rect
    public override void OnGUI(Rect position, SerializedProperty property, GUIContent label)
    {
        // First get the attribute since it contains the range for the slider
        RangeAttribute range = attribute as RangeAttribute;

        // Now draw the property as a Slider or an IntSlider based on whether it's a float or integer.
        if (property.propertyType == SerializedPropertyType.Float)
            EditorGUI.Slider(position, property, range.min, range.max, label);
        else if (property.propertyType == SerializedPropertyType.Integer)
            EditorGUI.IntSlider(position, property, Convert.ToInt32(range.min), Convert.ToInt32(range.max), label);
        else
            EditorGUI.LabelField(position, label.text, "Use Range with float or int.");
    }
}
Обратите внимание, что из соображений производительности функции EditorGUILayout нельзя использовать с PropertyDrawers.
Смотрите так же: PropertyAttribute class, CustomPropertyDrawer class.
Свойства
| attribute | Атрибут PropertyAttribute свойства. Не применимо для ящиков нестандартного класса. (Только чтение) |
| fieldInfo | Отражение FieldInfo для члена, который представляет это свойство. (Только чтение) |
Публичные Методы
| CanCacheInspectorGUI | Переопределите этот метод, чтобы определить, можно ли кэшировать графический интерфейс инспектора для вашего ресурса. |
| CreatePropertyGUI | Переопределите этот метод, чтобы создать свой собственный графический интерфейс на основе UIElement для свойства. |
| GetPropertyHeight | Переопределите этот метод, чтобы указать высоту графического интерфейса для этого поля в пикселях. |
| OnGUI | Переопределите этот метод, чтобы создать свой собственный графический интерфейс на основе IMGUI для свойства. |


